Quick Start Guide
Application in Promethist Studio
Welcome to Promethist Studio, where creating AI-powered applications is not just possible – it’s incredibly fast, intuitive, and scalable.
Whether you’re a strategist, conversation designer, or innovation leader, our platform empowers you to build intelligent digital assistants, called Personas, that deliver meaningful and responsive interactions – all in just a few steps.
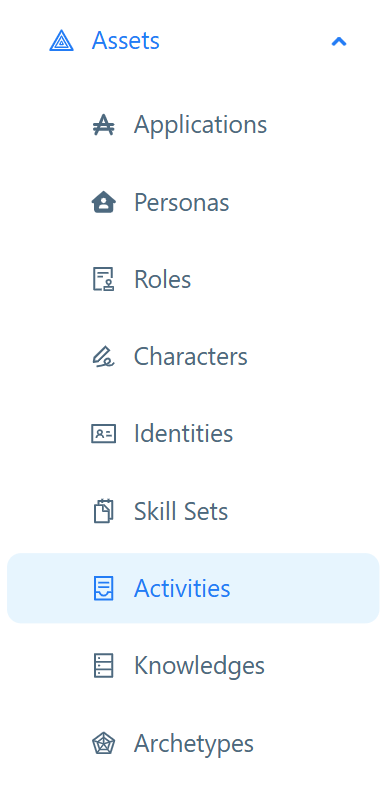
Assets in Promethist Studio
Promethist Studio is built around a set of core components called Assets. These assets serve as the building blocks for creating intelligent, AI-powered applications.
Here’s a quick overview of assets:
-
Applications – The final product, built with one or more Personas
-
Personas – Intelligent digital assistants that interact with users
-
Roles – The task or job function of the digital assistant
-
Characters – Tone, style, and behavior
-
Identities – Appearance and contextual linkage
-
Skill Sets – Bundled activities that define functionality
|
Skill Sets generally fall into two categories – social and business. Social Skill Sets focus on interpersonal interaction – things like casual conversation, greeting users, or offering encouragement. Business Skill Sets, on the other hand, are task-oriented and define the specific functions a Persona can perform – such as handling customer service requests or providing expert information. |
-
Activities – Core tasks or conversational exchanges
-
Knowledges – External information and data sources for the Persona
-
Archetypes – Predefined personality templates
The Core Logic Behind Assets
Once created, each asset is reusable – like LEGO bricks, they can be combined in different ways to build entirely new and unique applications.
Currently, there are only three standalone assets that can be created from scratch:
-
Archetypes
-
Knowledges
-
Identities
|
While creating an Identity does require selecting a compatible Archetype, you don’t need to build one manually – several Archetypes are already available by default in the Studio. |
The rest of the assets are interconnected and built upon one another:
-
Skill Sets consist of one or more Activities.
-
Characters include social Skill Sets, Knowledges, and compatible Archetypes.
-
Roles include business Skill Sets, business Knowledges, and compatible Archetypes.
-
Personas are made up of a Character, a Role, and an Identity.
-
Applications contain one or more Personas.
|
To build your first fully functional Application, you won’t need to create Archetypes or Knowledges – Archetypes are available in the Studio by default, and Knowledges serve as optional, supportive sources of information rather than a requirement. |
What You’ll Do with Assets Now
This guide focuses on the basics of asset creation to help you quickly understand how Promethist Studio works.
Our goal is to demonstrate how to build a functional application using only the required/essential fields.
|
While this simplified approach highlights the core features and workflow of the Studio, additional parameters play a key role in refining Persona behavior and overall performance. We’ll include links to detailed explanations for each optional parameter – but we won’t cover them in depth as part of this walkthrough. |
Save, Test, and Publish Thoughtfully
When working in Promethist Studio, each asset you create can be saved and edited freely before being published. Publishing makes the asset visible for other users on your project.
|
It’s often more effective to create and organize related assets in batches:
|
The same principle applies to connected assets like Characters, Roles, and Identities.
-
Assemble and test the complete Persona or Application
-
Use built-in testing tools to verify smooth functionality
-
Click Publish all changes to publish all new or updated assets together
You don’t need to publish assets immediately after creating them.
Group related changes, test them thoroughly, and publish only when you’re ready. This approach reduces errors and helps keep your builds clean, consistent, and production-ready.
Step 1: Log in to Studio
-
Use your company login credentials
-
By default, you’ll land on your Activities dashboard
Step 2: Create an Identity
-
Open the Identities tab from the Assets menu on the left
-
Click on Create
-
Fill out the mandatory fields:
| Field | Description |
|---|---|
Identity Asset Name |
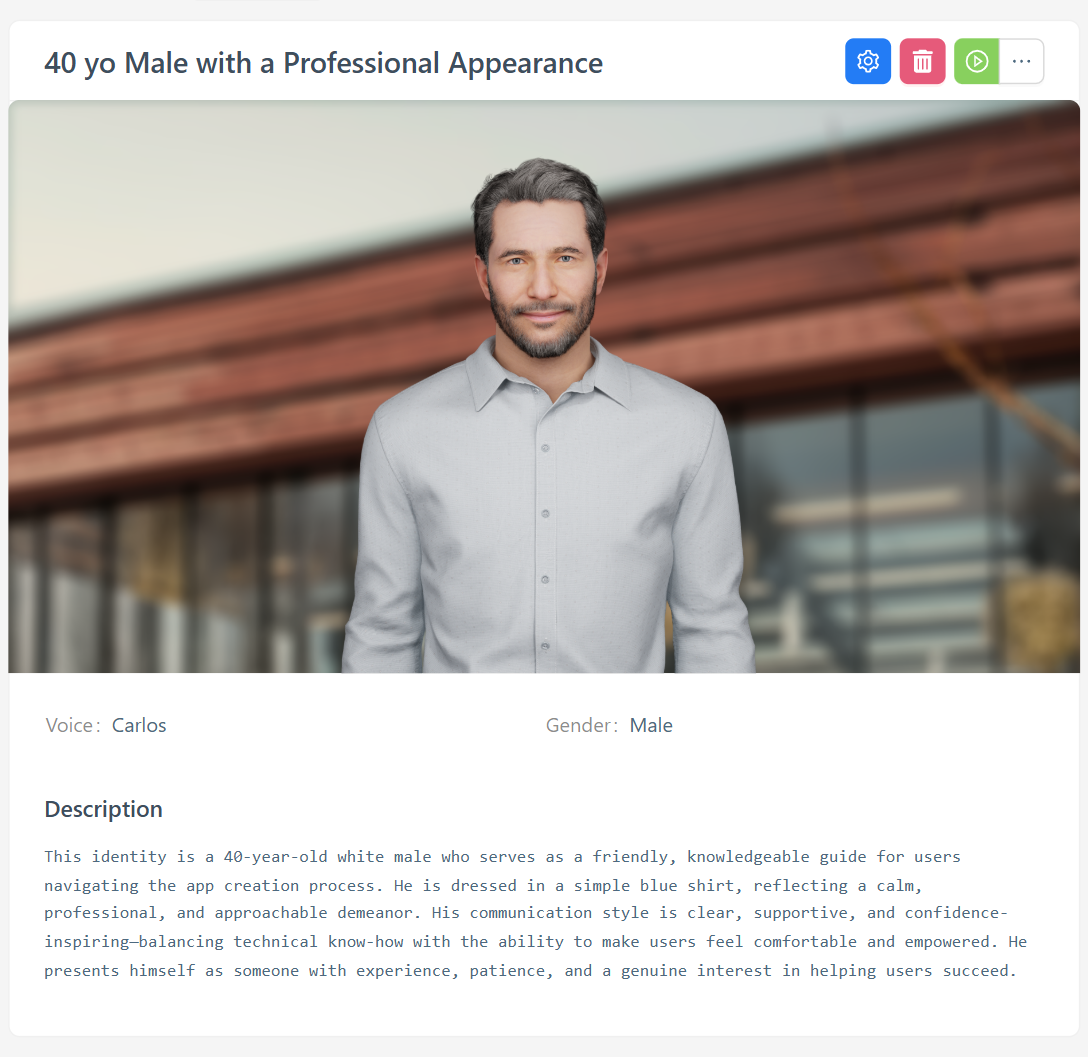
Enter the name associated with this Identity – it will be used for identification purposes, so make sure it’s clear and concise. Example: 40 yo Male with a Professional Appearance |
Avatar |
Select an appropriate avatar – consider the target audience and their visual expectations. Make sure the avatar aligns with the role it will represent. |
Background |
Select an appropriate background. |
Voice |
Choose the voice that will be used for the Persona – this will define how the Persona sounds during interactions. Select a voice that fits the intended tone and character. |
Compatible Archetypes |
Select from Archetypes that are available by default. |
Gender |
Select a gender. |
Identity Description |
Provide a description that defines the Persona’s identity – this helps shape how the Persona presents itself and interacts with users. Example: This identity is a 40-year-old white male. He is dressed in a simple blue shirt, reflecting a calm, professional, and approachable demeanor. His communication style is clear, supportive, and confidence-inspiring — balancing technical know-how with the ability to make users feel comfortable and empowered. He presents himself as someone with experience, patience, and a genuine interest in helping users succeed. |
Age |
Type age that corresponds to the appearance. Example: 40 years old |
Humor Type |
Select the humor type the Persona will use in interactions – choose from Self-Enhancing, Self-Defeating, Aggressive, or Affiliative. This choice will define the Persona’s overall style of humor. |
-
Scroll to the bottom and click on Create – this will save the Identity and add it to your asset library.
Step 2: Create Core Activities
-
Open the Activities tab from the Assets menu on the left
-
Click on Create
-
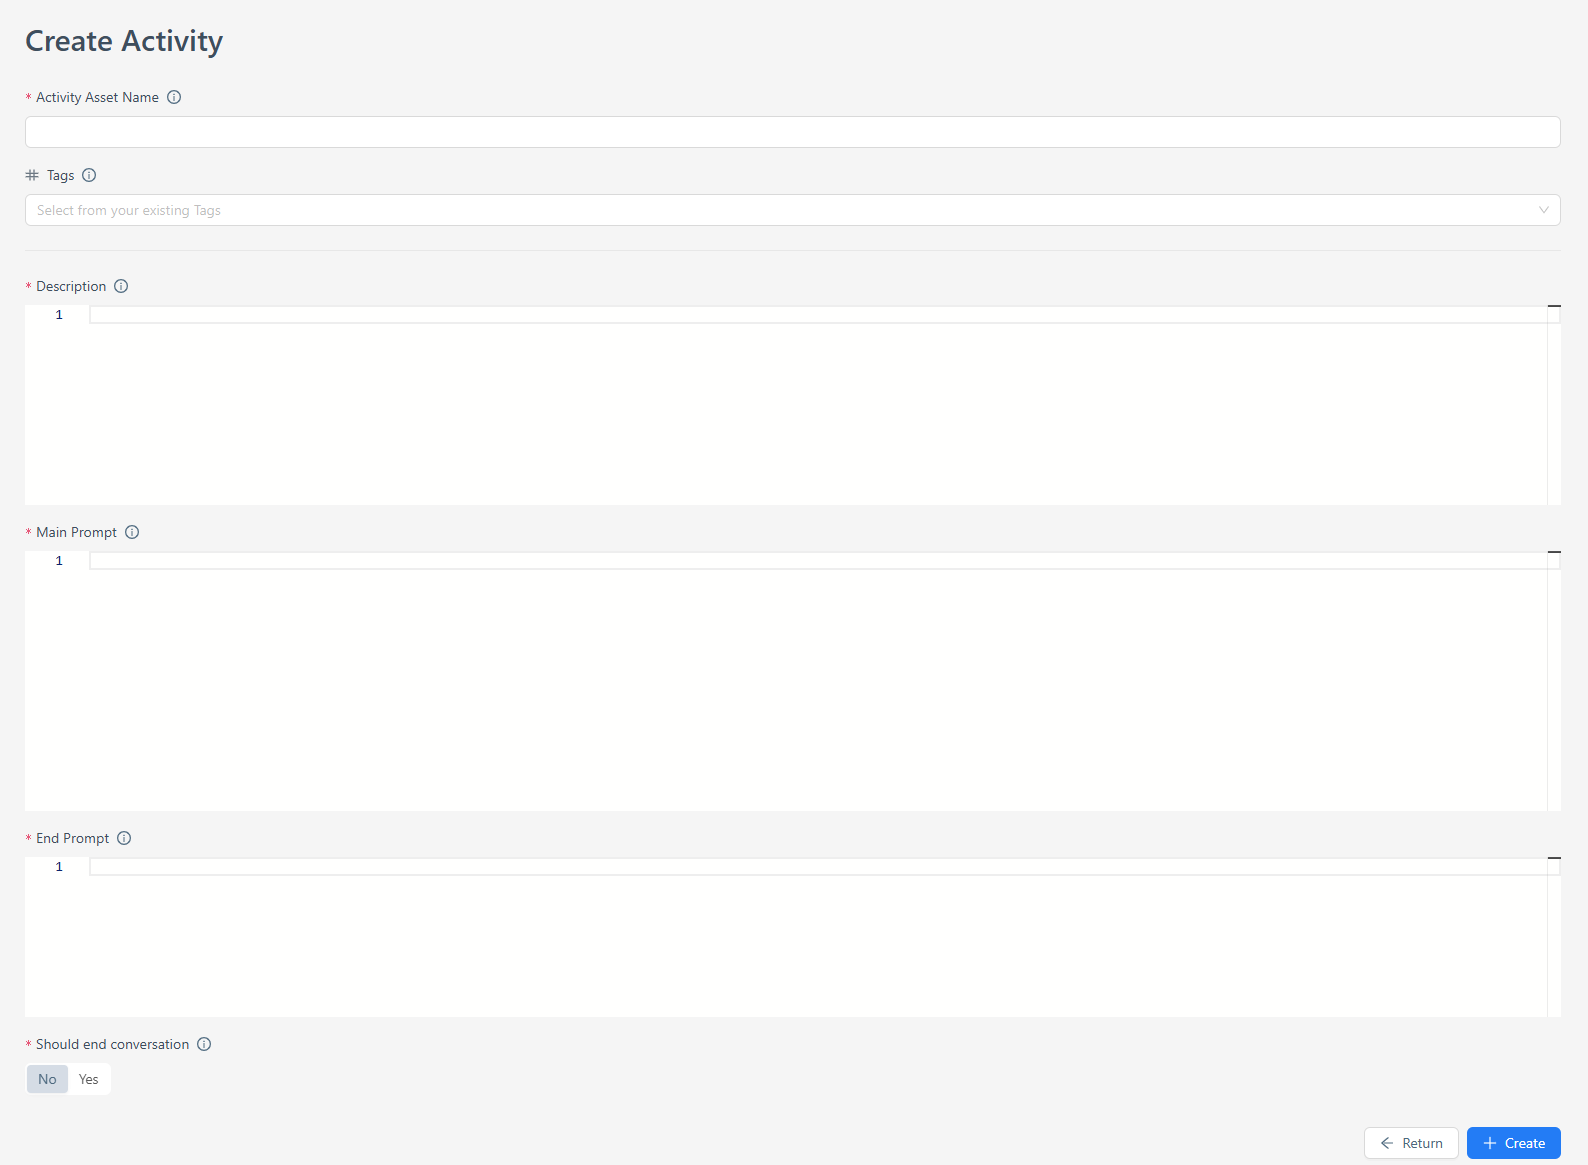
Fill out the mandatory fields as shown below
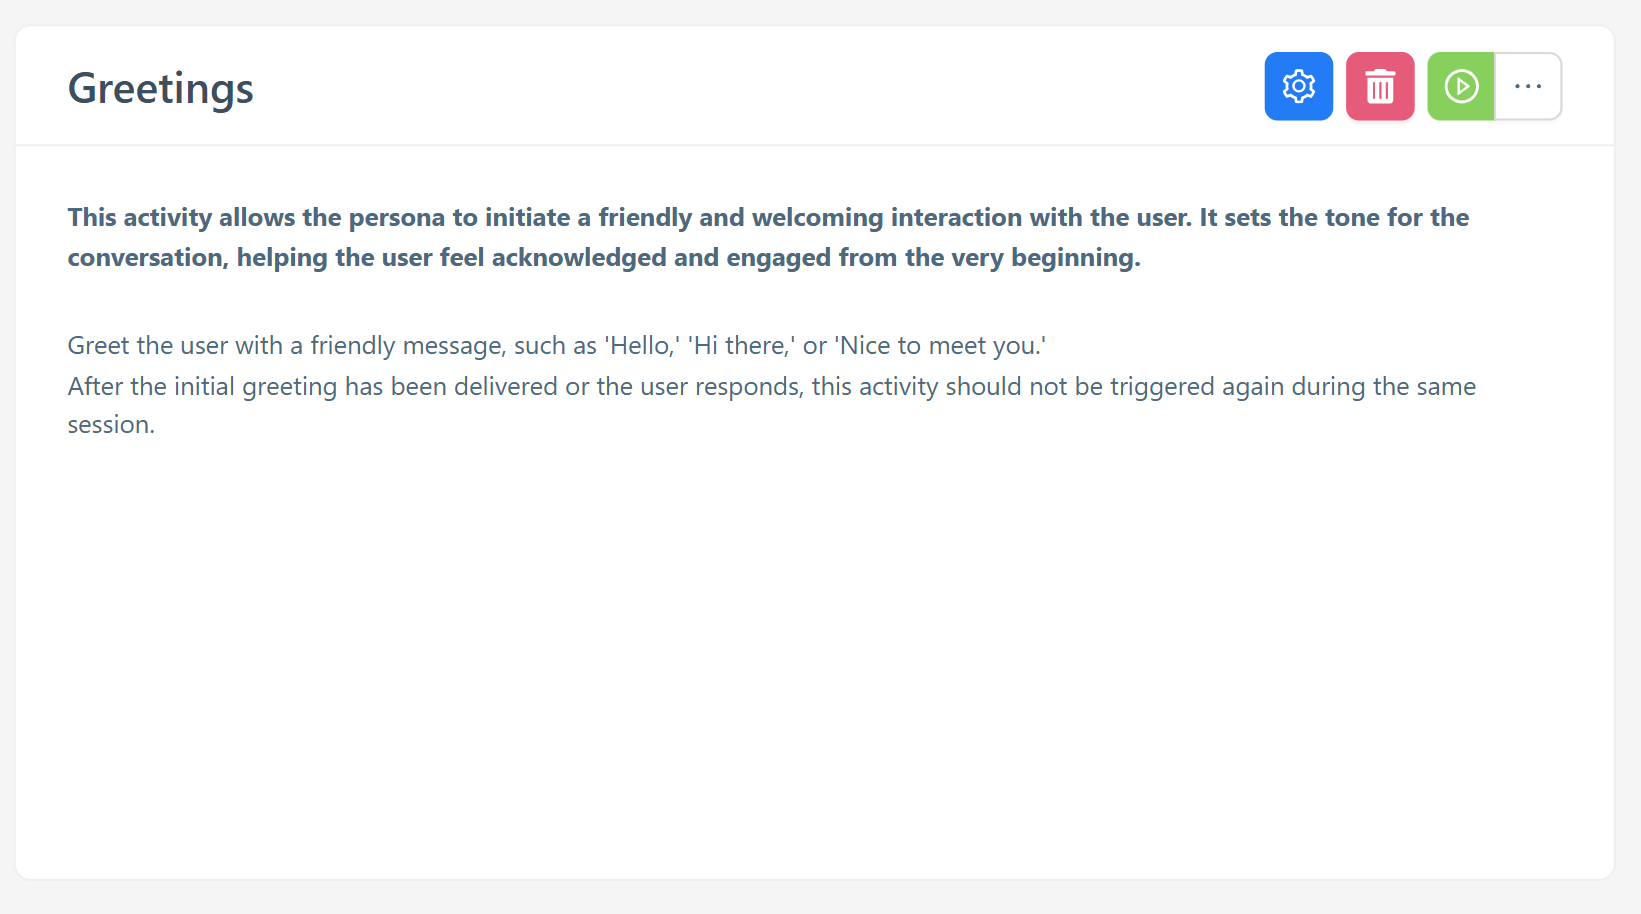
Greetings Activity
| Field | Description |
|---|---|
Activity Asset Name |
Enter the name of the activity. Example: Greetings |
Description |
Provide a brief and clear description of what the activity does – the Persona will use this to decide which activity to perform. Example: This activity allows the Persona to initiate a friendly and welcoming interaction with the user. It sets the tone for the conversation, helping the user feel acknowledged and engaged from the very beginning. |
Main Prompt |
Enter the prompt the Persona will execute when the activity is selected – it guides the Persona’s actions. Example: Greet the user with a friendly message, such as "Hello", "Hi there", or "Nice to meet you". |
End Prompt |
Describe the desired outcome after the activity is completed – once this is reached, the Persona deprioritizes this activity. Example: After the initial greeting has been delivered, this activity should not be triggered again during the same session. |
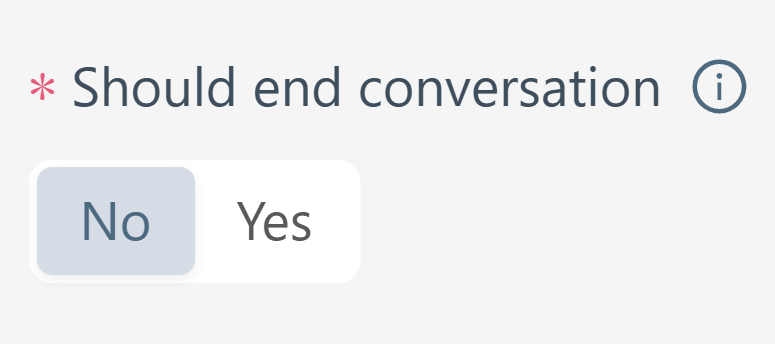
Should End Conversation |
Decide whether this activity should end the conversation when completed. Selection: No |
-
Scroll to the bottom and click on Create to save the activity and add it to your asset library.
Well-Being Check Activity
| Field | Description |
|---|---|
Activity Asset Name |
Enter the name of the activity – this will be used to identify it within the Studio. Example: Well-Being Check |
Description |
Provide a brief and clear description of what the activity does – the Persona will use this description to decide which activity to perform. Example: This activity is used by the Persona to check in on the user’s emotional or physical state. It helps establish a supportive tone, showing care for the user’s well-being before continuing with other tasks. It can be especially helpful at the start of a session or after a noticeable delay or sign of frustration. |
Main Prompt |
Enter the prompt the Persona will execute once the activity is selected – this prompt guides the Persona’s actions for the chosen task. Example: Ask the user how they’re feeling or if everything is okay. Keep the tone friendly and open-ended. |
End Prompt |
Enter the end prompt that describes the desired outcome of the activity – once this situation is reached, the Persona will deprioritize this activity. Example: Once the user has responded, this activity should not be repeated in the same session unless triggered by another well-being-related cue. |
Should End Conversation |
Enable this switch to decide if the conversation should end once the activity is selected and completed.
Selection: No |
-
Scroll to the bottom and click on Create – this will save the activity and add it to your asset library.
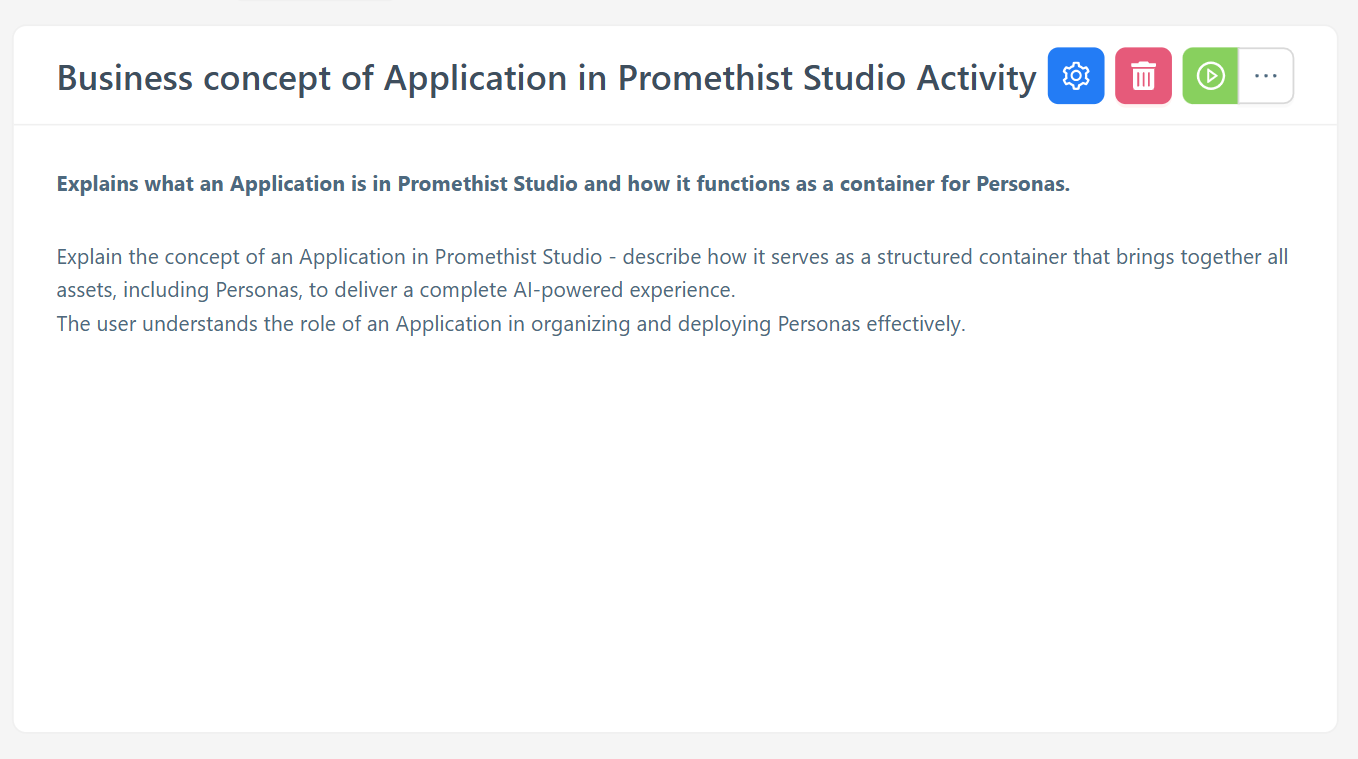
Business Concept of Application in Promethist Studio
| Field | Description |
|---|---|
Activity Asset Name |
Enter the name of the activity. Example: Business concept of Application in Promethist Studio |
Description |
Provide a brief and clear description of what the activity does. Example: Explains what an Application is in Promethist Studio. |
Main Prompt |
Enter the prompt that the Persona will execute once selected. Example: Explain the concept of an Application in Promethist Studio – describe how it brings together all assets, including Personas, to deliver a complete AI-powered experience. |
End Prompt |
Describe the desired outcome once the activity is complete. Example: The user understands the role of an Application in organizing and deploying Personas effectively. |
Should End Conversation |
Choose whether the conversation ends after this activity. Selection: No |
-
Scroll to the bottom and click on Create – this will save the activity and add it to your asset library.
Invitation to Learn About Each Asset
| Field | Description |
|---|---|
Activity Asset Name |
Enter the name of the activity. Example: Invitation to Learn About Each Asset |
Description |
Provide a brief and clear description of what the activity does. Example: Engages the user by offering to explain the purpose and function of different asset types used in Promethist Studio. |
Main Prompt |
Prompt the Persona uses when the activity is selected. Example: Ask the user if they’d like to learn more about the different asset types in Promethist Studio – offer to explain how each one contributes to building intelligent applications. |
End Prompt |
Describe the outcome after completion. Example: The user has either declined or completed exploring information about the asset types. |
Should End Conversation |
Choose whether the conversation ends after this activity. Selection: No |
-
Scroll to the bottom and click on Create – this will save the activity and add it to your asset library.
Explaining Each Asset in Promethist Studio
| Field | Description |
|---|---|
Activity Asset Name |
Enter the name of the activity. Example: Explaining Each Asset in Promethist Studio |
Description |
Briefly describe what this activity is for. Example: Provides detailed explanations of each asset type in Promethist Studio, including its purpose, role, and how it contributes to building a functional application. |
Main Prompt |
What the Persona will say or do. Example: Give the user a clear and concise explanation of each asset in Promethist Studio – describe what it is, what it’s used for, and how it connects to other assets in the process of building an AI-powered application. Include assets such as Applications, Personas, Roles, Characters, Identities, Skill Sets, Activities, Knowledges, and Archetypes. |
End Prompt |
Outcome of the interaction. Example: The user has received a complete overview of all asset types and their roles within the Studio. |
Should End Conversation |
Whether this activity concludes the conversation. Selection: No |
-
Scroll to the bottom and click on Create – this will save the activity and add it to your asset library.
Goodbyes Activity
| Field | Description |
|---|---|
Activity Asset Name |
Enter the name of the activity. Example: Goodbyes |
Description |
Brief description of the purpose. Example: This activity is used by the persona to say goodbye to the user at the end of an interaction. It serves as a polite and clear indication that the conversation is concluding or has concluded. |
Main Prompt |
Instructions for the Persona’s behavior. Example: Bid farewell to the user with a warm and considerate message, such as 'Goodbye,' 'Take care,' or 'Until next time.' Feel free to personalize the farewell to suit the context of the interaction. |
End Prompt |
Expected result that ends the activity. Example: The persona has bid farewell to the user. |
Should End Conversation |
Enable this option if the activity should end the conversation. Selection: Yes |
-
Scroll to the bottom and click on Create – this will save the activity and add it to your asset library.
Step 3: Create 1 Social Skill Set and 1 Business Skill Set
-
Open the Skill Sets tab from the Assets menu on the left
-
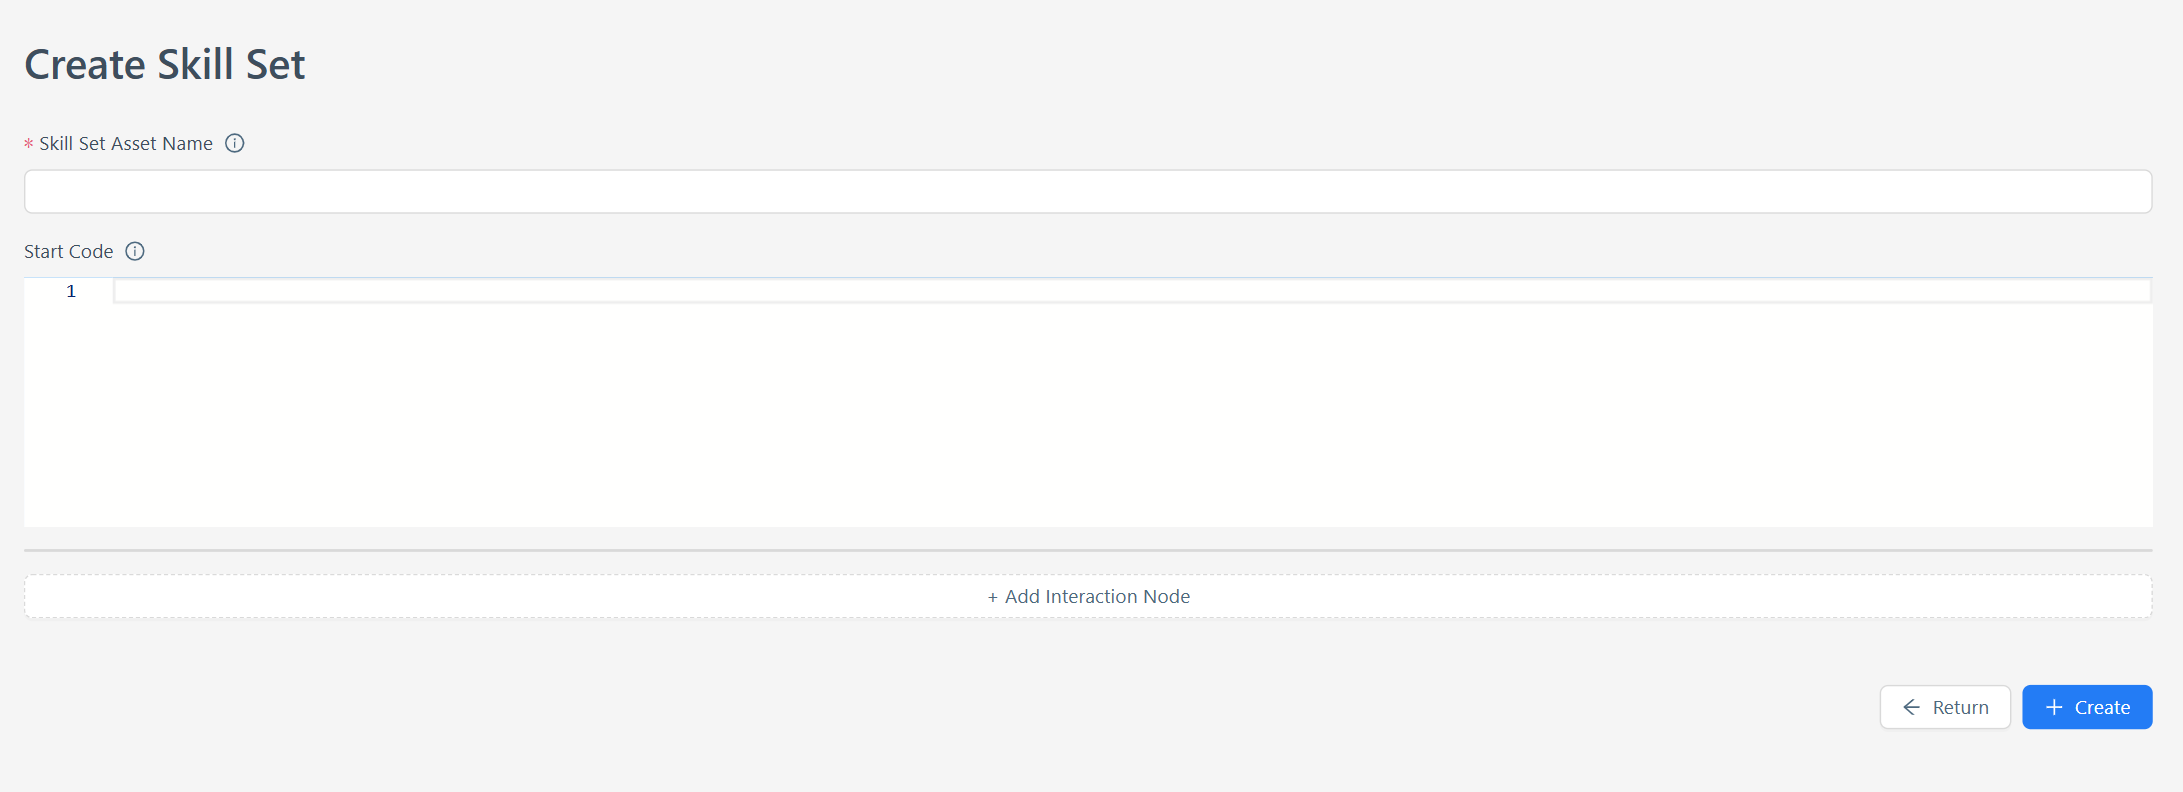
Click on Create Skill Set
-
Fill out the mandatory fields as described below
Social Skill Set: Well-Being Talk
| Field | Description |
|---|---|
Skill Set Asset Name |
Enter the name of the skill set – it will be used to identify it. Example: Well-Being Talk |
Add Interaction Node |
Add an activity or activities that are relevant to this skill set. Example: Add the “Well-Being Check” activity |
Node Type |
Select the type of interaction node. Selection: Activity Node |
Start Prompt |
Defines the condition for when this activity should trigger. Example: Trigger this activity if the user expresses frustration, stress, or sadness, or if it’s the start of a new session where emotional tone hasn’t yet been established. |
-
Scroll to the bottom and click on Create – this will save the Skill Set and add it to your asset library.
Business Skill Set: Initial Studio Walkthrough
| Field | Description |
|---|---|
Skill Set Asset Name |
Enter the name of the skill set – it will be used to identify it. Example: Initial Studio Walkthrough |
Add Interaction Node (1) |
Add the first activity Activity: Greetings Node Type: Activity Node Start Prompt: Select this activity as the very first one. |
Add Interaction Node (2) |
Add the second activity Activity: Business concept of Application in Promethist Studio Node Type: Activity Node Start Prompt: Select this activity after greetings. |
Add Interaction Node (3) |
Add the third activity Activity: Invitation to Learn about Each Asset Node Type: Activity Node Start Prompt: Select this activity after a user has been informed about the business concept of the application. |
Add Interaction Node (4) |
Add the fourth activity Activity: Explaining Each Asset in Promethist Studio Node Type: Activity Node Start Prompt: Select this activity when a user expresses interest towards information about the assets. |
Add Interaction Node (5) |
Add the final activity Activity: Goodbyes Node Type: Activity Node Start Prompt: Select this activity when users indicate they want to end the conversation. |
-
Scroll to the bottom and click on Create – this will save the Skill Set and add it to your asset library.
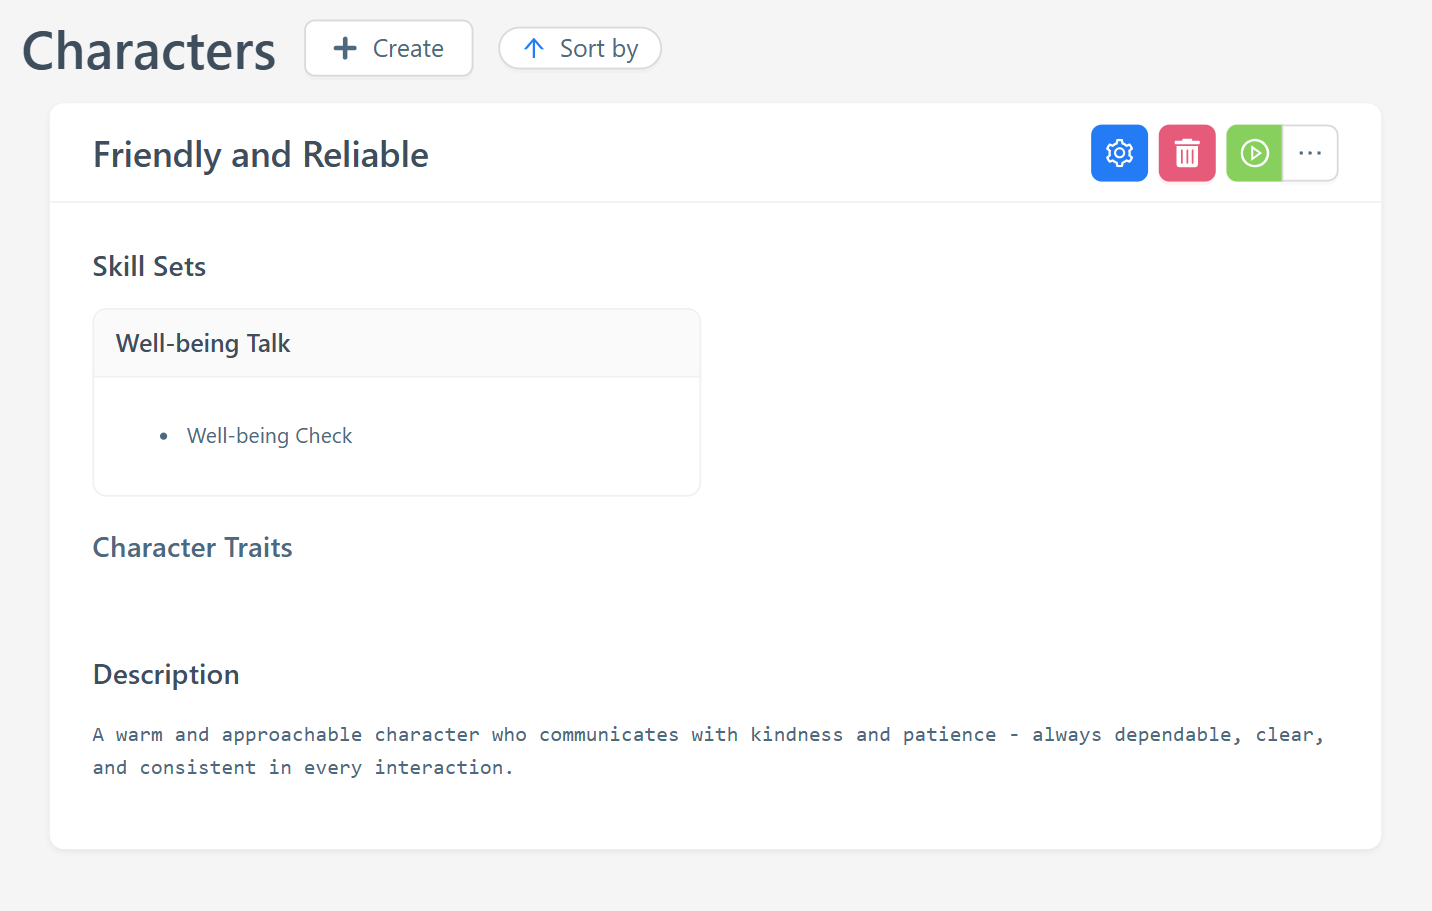
Step 4: Create a Character
-
Open the Characters tab from the Assets menu on the left
-
Click on Create
-
Fill out the mandatory fields as described below
| Field | Description |
|---|---|
Character Asset Name |
Enter the name of the character – this will be used to identify it within the Studio. Example: Friendly and Reliable |
Description |
Provide a brief description of the character – this will help define the traits, personality, and overall tone. Example: A warm and approachable character who communicates with kindness and patience – always dependable, clear, and consistent in every interaction. |
Skill Set |
Select an existing social Skill Set for this Character. Example: Well-Being Talk |
Archetype |
Select a predefined Archetype from the Studio – this will shape the character’s core behavioral patterns and communication style. |
-
Scroll to the bottom and click on Create – this will save the Character and add it to your asset library.
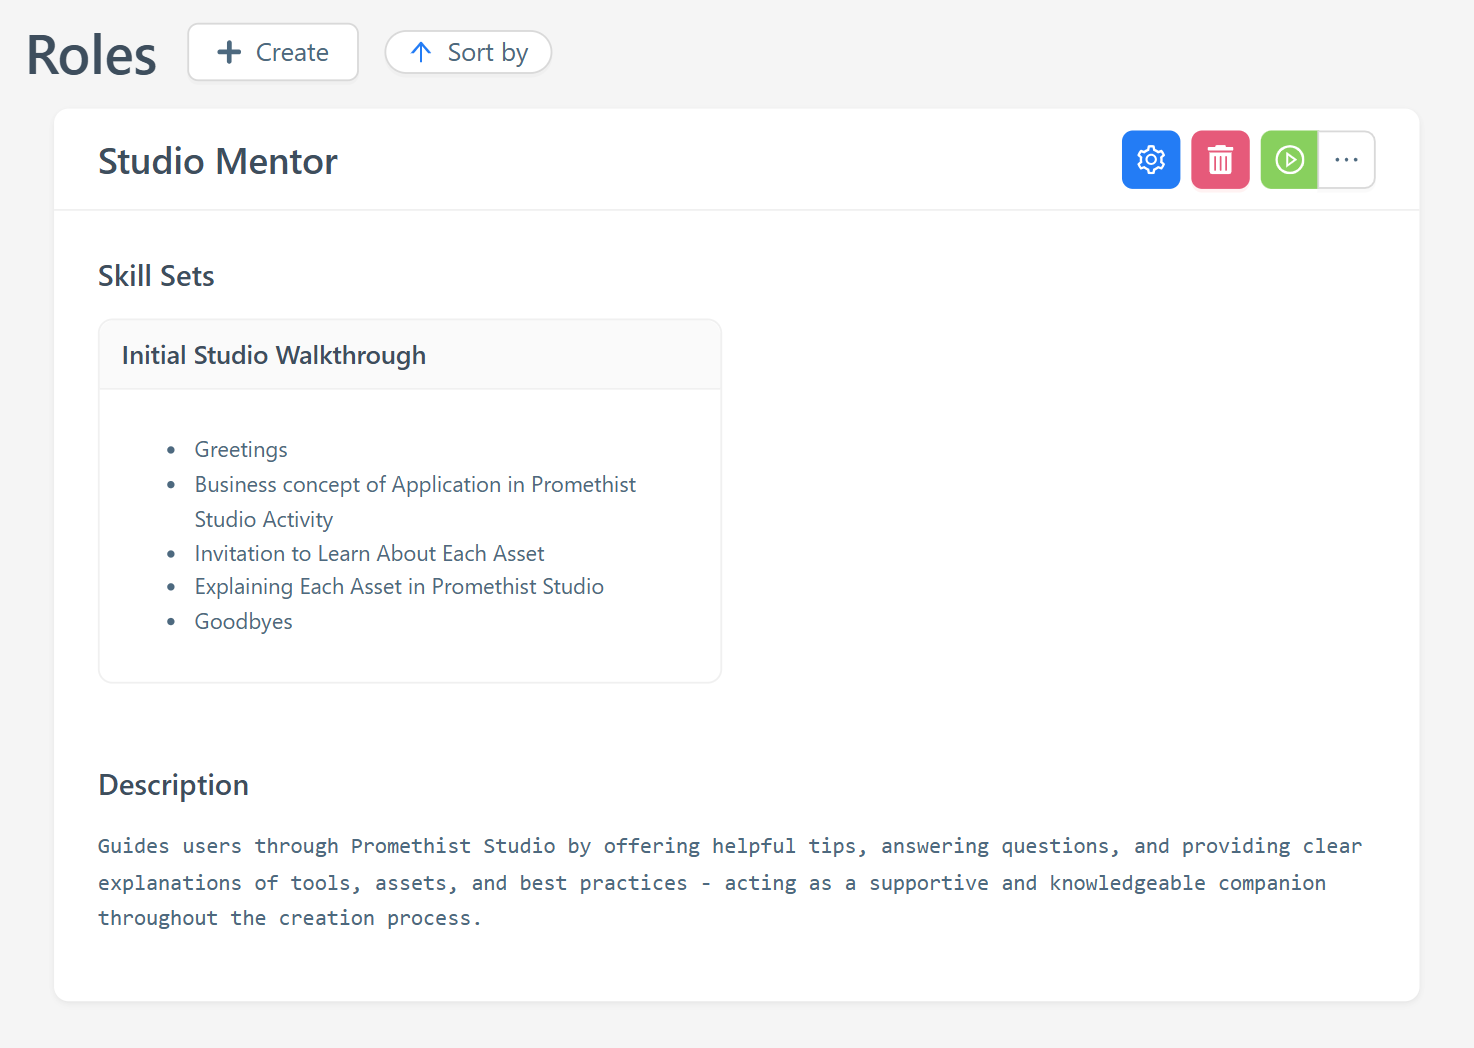
Step 5: Create a Role
-
Open the Roles tab from the Assets menu on the left
-
Click on Create
-
Fill out the mandatory fields as described below
| Field | Description |
|---|---|
Role Asset Name |
Enter the name associated with this role – it will be used for identification purposes. Example: Studio Mentor |
Description |
Provide a description for this role – it should outline the key responsibilities and functional duties. Example: Guides users through Promethist Studio by offering helpful tips, answering questions, and providing clear explanations of tools, assets, and best practices – acting as a supportive and knowledgeable companion throughout the creation process. |
Skill Set |
Select a business Skill Set. Example: Initial Studio Walkthrough |
Compatible Archetypes |
Select a predefined Archetype from the Studio |
-
Scroll to the bottom and click on Create – this will save the Role and add it to your asset library.
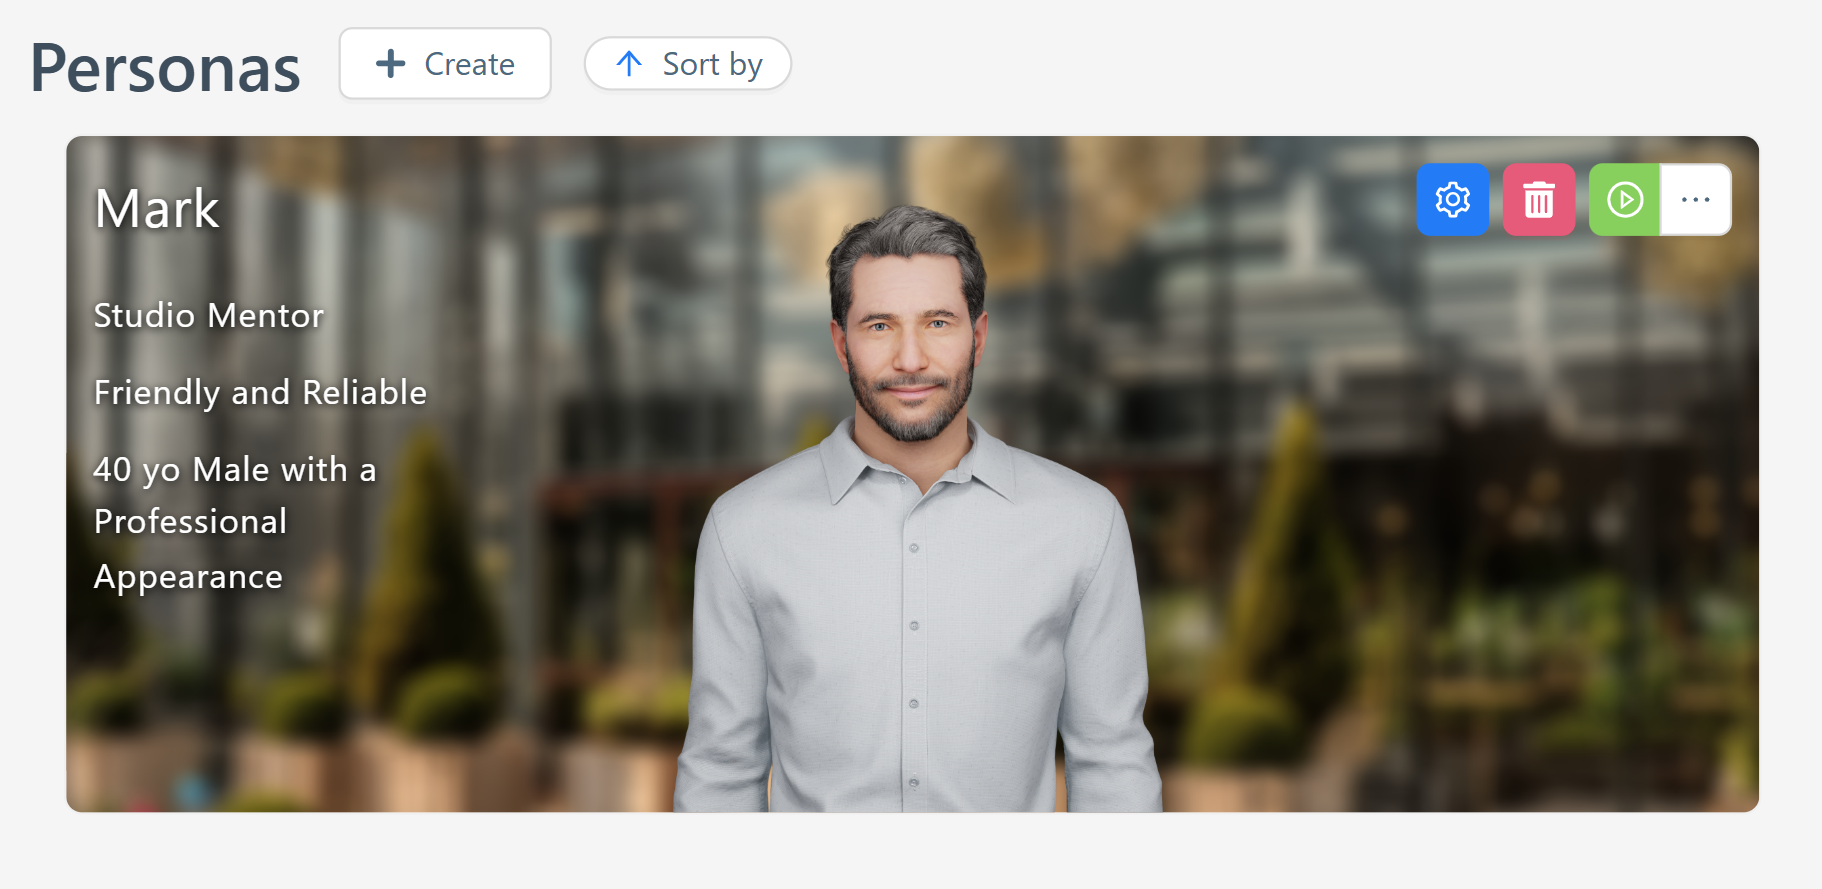
Step 6: Create a Persona
-
Open the Personas tab from the Assets menu on the left
-
Click on Create
-
Fill out the mandatory fields as described below
| Field | Description |
|---|---|
Persona Name |
Enter a name for your Persona Example: Mark |
Character |
Select the Character Example: Friendly and Reliable |
Role |
Select the Role Example: Studio Mentor |
Identity |
Select the Identity Example: 40 yo Male with a Professional Appearance |
-
Scroll to the bottom and click on Create – this will save the Persona and add it to your asset library.
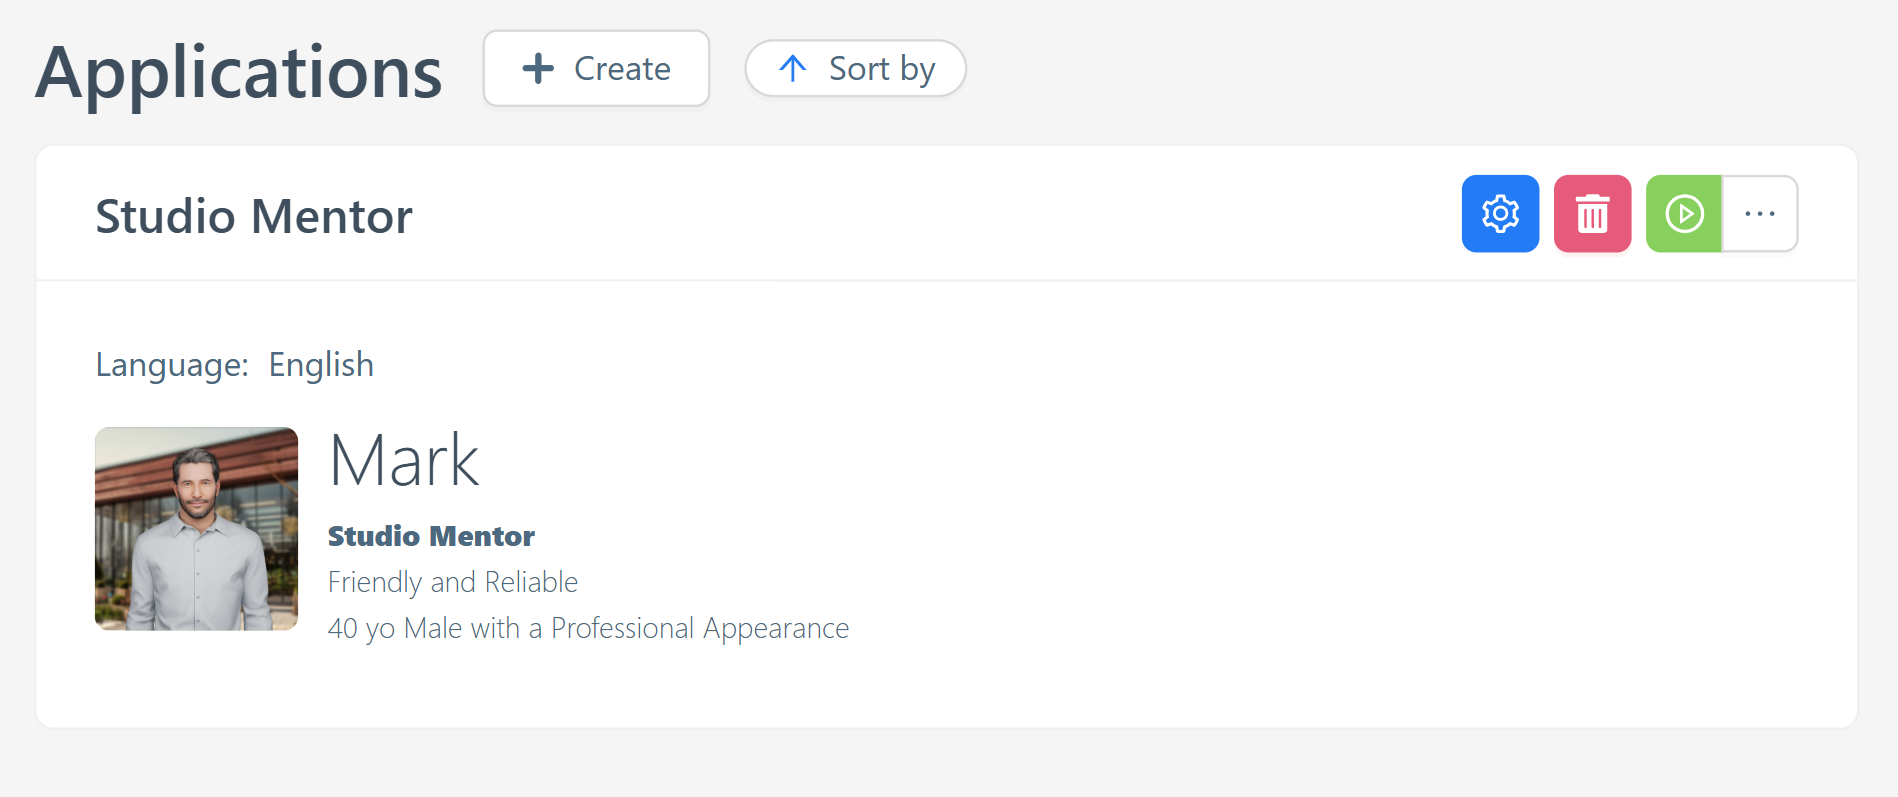
Step 7: Create an Application
-
Open the Applications tab from the Assets menu on the left
-
Click on Create
-
Fill out the mandatory fields as described below
| Field | Description |
|---|---|
Application Name |
Name your application Example: Studio Mentor |
Personas |
Select one or more Personas to include Example: Mark |
Languages |
Select the language your application should support Example: English |
-
Scroll to the bottom and click on Create – this will save the Application and add it to your asset library.
Next Steps
Now your application is fully prepared to be active. The last thing you need to do is:
-
Publish all changes (as we discussed above)
Test the Application
-
Navigate to the Applications tab
-
Click on the green Testing button
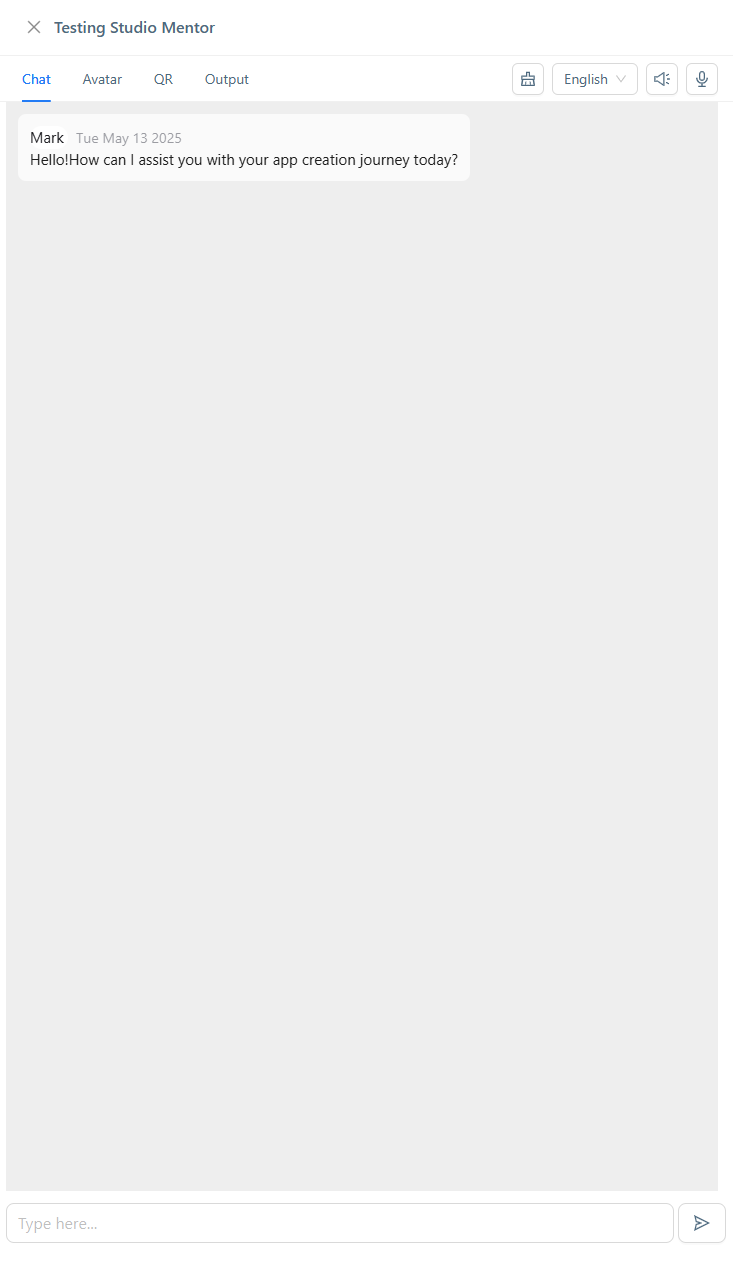
Now you have several testing options:
-
Chat tab – Test your app in dialogue mode *Use case: Ask relevant questions and ensure the responses match the expected behavior based on your setup_
-
Avatar tab – Test how the Avatar appears and behaves visually
-
QR tab – Test your app as a Mobile App or Web Client